Showing posts with label nailart. Show all posts

Thursday, April 3, 2014

101 dalmatians nailart

This is the first time I give myself a cartoon manicure, but I couldn't resist:) After watching dolceorsetta's video on youtube, I felt I had to try this..


Playing with the french tips' color and shape seemed the best way to go. I left my ringfingers and thumbs for painting.


 I know it will sound like excuses, but imagine this: painting the thums is difficult, you never have them in the right position, painting with my left hand was difficult as well.. and on top of it all, I had to paint the puppy watching the camera every now and then, to make sure my right hand wasn't in the way.. Hm, it was a challenge, but it was so much fun!


If you want to check the video, click here.
Items used:

Spring Color Pop nailart

It is finaly spring here, and you get to see many flowers of different color everywhere!
Why not on your nails??


All the flowers and scrolls are made with acrylic paint. The point was to have many colors, but also a black pattern to "keep" them together, complimenting the mint blue polish by Color Club.


Different light and the colors show a bit different too..  Here are the material I used:


You can check the tutorial on my youtube channel by clicking here.

Fruity french manicure

Another red manicure, this time it is a french one, and the polish used is again by Indigo.


Of course there is some glitter involved, there is always some glitter involved..:)


Wherever you see red, it is with the same polish, "Red Delicious" by Indigo. All the rest is acrylic paint. The outlines were made with a water color pencil.


If you like it, check the video by clicking here.

Sunday, January 26, 2014

Easy delicate french with glitter and flowers

I had a request to show how I did this french manicure. The original was on my sister, Maria, with NSI gels.


This time I used polish and acrylic paint. First I covered all nails with a french pink polish, Korres "washed off pink". I had to do this, because on my right hand I have a gel overlay with a dark pink shade, so this made them both look the same. If I hadn't, I would use a normal french pink and continue with the french with Seventeen N.103 (white). Since my nailbed was too dark, I used Korres " Pink Shamagne" over the darker pink.


I applied some glitter diagonaly, and covered with topcoat. When it dried, I started painting the easiest flowers ever: daisies. Some dots and scrolls to fill the pattern and make it look more delicate, a rhinestone in the center and the final top coat.


These are the products I used:


 I have already uploaded the tutorial on youtube,
if you are interested, go check it out by clicking here.

My next tutorial is a Valentine's design, in the "no tools" category, and it will be uploaded on Tuesday.  

Thursday, January 16, 2014

Duochrome polish and one stroke nailart

I've had this amazing polish for a month, before I managed to try it. It is by Seventeen, and the code is 539. It is supposed to be a duochrome, but depending on the light and the angle you have your nails at, you can see gorgeous purple/burgundy, olive green, and bronze. And all these with metallic/shimmery effect.


I decided to make some classic one stroke flowers, using similar colors (the purple and green), and keep them close to the cuticle, so that the color shows best on half the nail. Here are some pictures taken inside with artificial light:


and one taken outside, with my cellphone..


I have filmed the nailart process, edited so that I wouldn't take more of your time, and uploaded the video on youtube. I hope I showed all the steps in a comprehensive way..  If you decide to do this on short nails, skip the entire flower and just make 2 or 3-petal ones at the corners of ring and middle finger. This way there will still be enough space for the lovely color to show..

To watch the video on youtube, click here.

These are the products I used:


Seventeen nail polish N.539
CND Super mat topcoat
Lidan waterbased acrylic paints in purple and white
Oumaxi waterbased acrylic paints in leaf green and gold
Flat angle brush and detail brush from ebay (different sets)


Monday, January 6, 2014

My new year's nails - pure gold

This is the first time I ever use a peel off base for polish. I figured it was a good time to test it, since my last minute nails would be practicaly dipped in gold glitter:)

Here is what I did at the last day of 2013, a couple of hours before dinner:


and here is with the 3d bows I added a couple of days later:


The second picture was taken with my phone. The real color is gold, so it is somewhere in the middle. 

Saturday, December 28, 2013

More "Jewels"

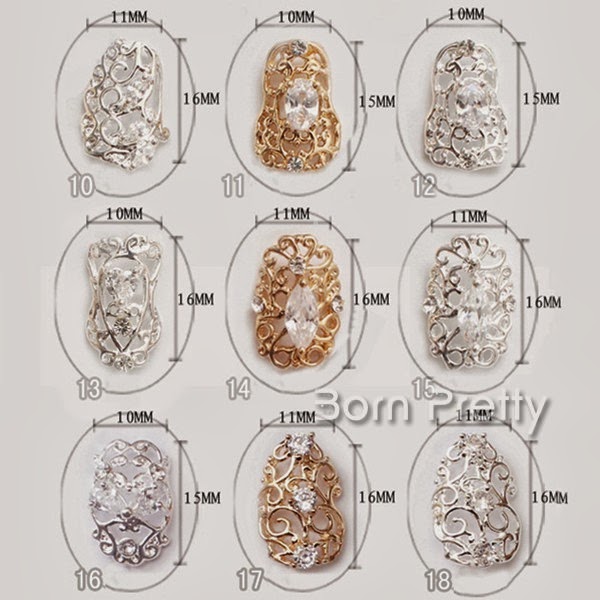
These metal decorations are amazing! They realy transform your plain polished nails into precious jewels..


They are very easy to use, just adhere them with nail glue (or acrylic, if you want to keep them longer). Nail glue kept them on my nails 3 days, until I removed them myself to do something else:)


There are many more sizes and shapes, with different decorations. Go check their store to see which one you like and fit your nails:) http://www.bornprettystore.com/2pcs-luxury-style-nail-crystal-embossed-metal-nail-decorations-p-10749.html

Feel free to use the 10% discount code LNSW10 at checkout

I have also uploaded a video review on youtube, check it out if you are interested:


On my nails, there are 2 coats of a shimmery blue raf polish, Glamorous Nr. 67, and the metal decoration n.5


I also checked how they look on top of some other colors:

Color Club "Apollo Star"  and Korres "Washed Off Pink"

Erre Due "Matt Glam N.280" and OPI "Austin-Tatious Turquoise"

Bornprettystore Sweet "S049" and ColorClub "N.220 Seduction"

Remember I also used N.6 metal decoration for a gold new year nailart, in a previous post.

It looks very beautiful, don't you think?


Thursday, December 26, 2013

Precious Jewels

You can never go wrong with glitter.. especially these days

And nailart can never be too much for these days either. She came to me on the very last day, had her gel extensions with NSI, and asked for gold.. my pleasure:)


So, we finished with the gel application, shaped, buffed and top coated, and made a french with polish (Glamorous N.103, it is a simple gold polish). Then applied Golden Rose "Jolly Jewels n.103" on top of it, and while it was still wet, sprinkled some LCN holografic gold glitter (n.1 multi gold). I applied top coat on half the nail surface, to seal the glitter and make the transition smoother.
Then it was time for decorations:)

I was given these metal embossed decorations from bornprettystore, to review them. When I first saw them I was like "Woah!". Would I have them on my nails? Of course!!!! Would others?
I showed them to her and she instantly loved them.


Go take a look at bornprettystore, here is the link to these beautiful metal decorations: http://www.bornprettystore.com/2pcs-luxury-style-nail-crystal-embossed-metal-nail-decorations-p-10749.html The ones I used for Mary are N.6.


They come in pairs, and you can see the actual dimensions before you purchase. They are slightly curved, but keep in mind that each person's nail has a different c curve. I applied them with nail glue, and the 4 corners were fit perfectly on her nails. Then secured with a thick topcoat around them, not because I didn't want any water in, lol, just a second measure for their safety:) If you want to secure them for much longer, you can use a tiny ammount of clear acrylic.

The surface is irregular, like any ring with diamonds and stones.. You should not expect them to be smooth, they are jewels after all. They will not catch your hair, and they will not scratch when you wash your hands (yes, I got asked this question too, lol). The color will remain intact with washing and bathing. I had them on for 3 days myself, for the purpose of a review.


Bornprettystore offers 10% discount for any purchase you make from their online store, using the coupon code LNSW10 during checkout. Also, they offer free shipping worldwide.

I wish you all have happy holidays, blessings to you and your families <3 


Monday, December 23, 2013

Last minute nailart - easy bows - No tools

Here is a super easy nailart for new years eve, or party... or any other occasion if you change the colors:)


It seems I am stuck with red and gold these days.. I will not say glitter, because I love glitter all year long:)


Well, this nailart is done with a toothpick, no tools needed. I polished my nails, used the toothpick to paint a gold bow, and used the same toothpick to engrave the lines inside, the details. Here is the video of this super easy, last minute nailart:


The products I used:
CND "Veronica"
CND "Gold sparkling"
GLAMOROUS (gold)
SEVENTEEN N.529 Platinum Gold (glittery)
and of course, the toothpick!

I have already been asked to recreat this look, over red polishes. Maybe I will add the photo of it on top of IBD "Cosmic Red", but I can't edit any picture right now, too tired..


Christmas nailart with stickers

Normally, I use stickers for my pedicures (being lazy..) but this time I really had fun!


Bornprettystore sent them to me for a review. There were 12 sets in 1 sheet, and you can tell how vivid the colors are, and how fine the gold details, even from my pictures. There are many designs, snowmen, santa, christmas trees, snowflakes, sleights, even some borders that you can use for your nailart:


I made a classic white french, sideswiped with red, and applied my stickers. How easier can it get, really?


These are the products I used:
Korres "Washed off pink"
Seventeen (white n.103)
Erre Due "Glitter effect N.986" over the white polish
ColorClub N.220 "Seduction"

If you are interested in watching the review/nailart video, here it is:


Bornprettystore offers a 10% discount, if you use the following code during checkout:

LNSW10

Valid for anything you purchase from their website, free shipping worldwide.