Showing posts with label easy. Show all posts

Thursday, March 20, 2014

The foiled rose

Here is the "Red Carpet" by Indigo. It is a beautiful red, with very discrete gold shimmer. You can't see it unless you are searching how to describe the color, lol, but it gives the polish a very beautiful tone.


For the roses, I used the french pink background and made the rose pattern with polish. I let it dry and applied the gel paint to make the outlines. Cured in a uv lamp for 2 min and applied the golden foil.


The risk you have when you are working with polish, is that even when it feels dry (but isn't) it may pick some foil as well. So I got some foil on the red part, and filled it again with red. I think I lost some of the 3d effect, but saved the design:) Oh, the topcoat should better be a soak off, or any that you know that it will not crack and rinkle the foil..


Foil is very important, I had many gold foils that didn't work. The ones that work are super thin, and make small breaks if you fold them.. If you want to watch the tutorial, click here

Sunday, January 26, 2014

Easy delicate french with glitter and flowers

I had a request to show how I did this french manicure. The original was on my sister, Maria, with NSI gels.


This time I used polish and acrylic paint. First I covered all nails with a french pink polish, Korres "washed off pink". I had to do this, because on my right hand I have a gel overlay with a dark pink shade, so this made them both look the same. If I hadn't, I would use a normal french pink and continue with the french with Seventeen N.103 (white). Since my nailbed was too dark, I used Korres " Pink Shamagne" over the darker pink.


I applied some glitter diagonaly, and covered with topcoat. When it dried, I started painting the easiest flowers ever: daisies. Some dots and scrolls to fill the pattern and make it look more delicate, a rhinestone in the center and the final top coat.


These are the products I used:


 I have already uploaded the tutorial on youtube,
if you are interested, go check it out by clicking here.

My next tutorial is a Valentine's design, in the "no tools" category, and it will be uploaded on Tuesday.  

Wednesday, January 22, 2014

Quick nailart with polish

Vinilux "Rubble" is one of the hottest colors of the season.
Personally, I love Vinilux polishes, they are applied easily, cover really well and dry super fast. They say that they last longer than normal polish (7 days with no chipping, no basecoat), but I really can't say, since all polishes last well on me.


I made a quick design with no water marble. I used a coat of Vinilux Rubble, and a coupke of drops from NfuOh 544 and a white polish, marbled quickly with a needle, and applied rhinestones in the smileline. Super quick:)

Monday, January 6, 2014

My new year's nails - pure gold

This is the first time I ever use a peel off base for polish. I figured it was a good time to test it, since my last minute nails would be practicaly dipped in gold glitter:)

Here is what I did at the last day of 2013, a couple of hours before dinner:


and here is with the 3d bows I added a couple of days later:


The second picture was taken with my phone. The real color is gold, so it is somewhere in the middle. 

Saturday, December 28, 2013

More "Jewels"

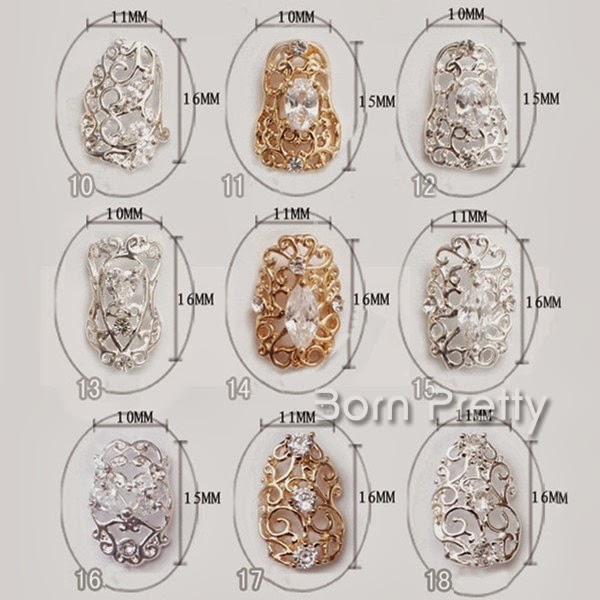
These metal decorations are amazing! They realy transform your plain polished nails into precious jewels..


They are very easy to use, just adhere them with nail glue (or acrylic, if you want to keep them longer). Nail glue kept them on my nails 3 days, until I removed them myself to do something else:)


There are many more sizes and shapes, with different decorations. Go check their store to see which one you like and fit your nails:) http://www.bornprettystore.com/2pcs-luxury-style-nail-crystal-embossed-metal-nail-decorations-p-10749.html

Feel free to use the 10% discount code LNSW10 at checkout

I have also uploaded a video review on youtube, check it out if you are interested:


On my nails, there are 2 coats of a shimmery blue raf polish, Glamorous Nr. 67, and the metal decoration n.5


I also checked how they look on top of some other colors:

Color Club "Apollo Star"  and Korres "Washed Off Pink"

Erre Due "Matt Glam N.280" and OPI "Austin-Tatious Turquoise"

Bornprettystore Sweet "S049" and ColorClub "N.220 Seduction"

Remember I also used N.6 metal decoration for a gold new year nailart, in a previous post.

It looks very beautiful, don't you think?


Monday, December 23, 2013

Christmas nailart with stickers

Normally, I use stickers for my pedicures (being lazy..) but this time I really had fun!


Bornprettystore sent them to me for a review. There were 12 sets in 1 sheet, and you can tell how vivid the colors are, and how fine the gold details, even from my pictures. There are many designs, snowmen, santa, christmas trees, snowflakes, sleights, even some borders that you can use for your nailart:


I made a classic white french, sideswiped with red, and applied my stickers. How easier can it get, really?


These are the products I used:
Korres "Washed off pink"
Seventeen (white n.103)
Erre Due "Glitter effect N.986" over the white polish
ColorClub N.220 "Seduction"

If you are interested in watching the review/nailart video, here it is:


Bornprettystore offers a 10% discount, if you use the following code during checkout:

LNSW10

Valid for anything you purchase from their website, free shipping worldwide.


Wednesday, December 18, 2013

Easy christmas nailart with foil

Last week I gave foils another try. I enjoy their looks, but I get so frustrated when they crack right after top coat.. and I have tried so many!


 I applied a dark red polish on all nails, except the ringfingers, where I applied a gold one. Then I applied foil adhesive, waited until it became transparent, and added the foil.

This time I tried 2 methods: On one hand I applied NFU Oh Aqua base on top of the foil (dries a bit slow) and then I used CND Super Shine top coat, which is not a fast dry one. Fast dry top coats always crack the foil.. The cracks were barely visible, but the foil lost some of the holo effect.

On the other hand, I applied the foil adhesive on top of the foil, let it dry very well (about 20min) and then I applied the Super shine top coat. This had the best results I have seen with polish so far, barely seen cracks and barely lost holo effect.

You can definately say which one is which..


    Then I decided it was too plain, so I added some gold stamping and glitter:)


I know, the thumb is different, but I always try on my thumbs first. I didn't like this Cheeky stamp, so I did the rest with another one, from the same Jumbo plate:)

Would you try foils for your nailart these days?


Saturday, December 7, 2013

Red glitter and snowflakes

These are a friends nails, with gel overlay, soak off polish and hanpainted snowflakes:) I used Indigo for my overlay and base color, and applied Cuccio Veneer "Manhattan Mayhem" on top, for this beautiful red sparkle. The snowflakes are made with acrylic paint.


Tuesday, November 26, 2013

How I make my matching nailart rings

A few months ago,  I started collecting pebbles from the beach with my daughter. We wanted to clean them, polish them and use them to fill jars et.c... Mom had some polishes to swatch, lol, so I polished a few.


When time came to wear this polish and make a design on my own nails, I made the same design on the polished pebble, covered it with top coat and used nail glue to attatch the ring base.


If you are not familiar with gel or acrylic to make round (or not) flat shapes for your ring, try the stores that have pebbles for decoration, anything flat and lightweighted can do. A friend squeezed until flat the coffee capsules and added rhinestones, it worked beautifuly!

The adjustable ring holders are from ebay, I got 20, but I remove them and use them for my next ring. If you want them to stay longer, use E2000 glue.

Here is the video from my youtube channel:


No limits to creativity.. Try your own, give it a shot, you may get addicted, lol.

Deff Le(o)pard

Gorgeous Vinilux Rubble!! I love this color, so perfect for fall and winter...
As all Vinilux polishes, you apply it directly on your nails, without any base coat. It covers beautifuly and dries fast. What more should we ask for?
Well, a design, maybe? And if you are in mood for something easy and effortless, you can always try a nailart foil with animal print and swarovski crystals..


The method with foils is realy simple. You let your base color dry completely, and apply a thin and even layer of the foil adhesive. It is milky bluish white when you apply it, but turns transparent when it dries. Let 1-2 more minutes and apply the foil, pattern up. Press with your thumb or cotton bud, making sure that you pressed on the sides as well. The foil should separate from the transparent film at this point, so when you lift it, the pattern stays on the adhesive.


Add your favorite (and ours..) swarovski crystals, and you are finished!

 
Products used for this nailart:


The swarovski crystals are SS9, clear, and I received them for my Bornprettystore review.
Click here for the relative video on youtube.

10% discount on your bornprettystore purchases, using the code LNSW10.  

Metallic blue and easy flower decoration

I enjoy reading the names that the companies find for their polishes! After having a "Guns and Roses" and a "Deep Purple" video, I stopped trying to find names. This was automaticaly the "Metallica" and I have an un-edited animal print design (Guess what the title will be, lol). You can watch the tutorial here.


Peronal Stylist by ColorClub is a gorgeous color, which I failed to capture with my camera:) If you love bold metallic colors, then this is one you should have.. I started making the design, but realized that the white was more distracting than what I was aiming for, so I added more colors and various rhinestones, which complimented it without taking the first role in this play. You could also try one stroke, but I already had it a few weeks ago over a similar blue polish (I love blues).. Un-edited as well..

Products I used for this design:


I did the ring the exact same way as my nails, it was just big enough to fit the whole flower.

Monday, October 14, 2013

Green leopard print

I decided to show some nail designs that can easily be done with nail polish and tools we can find in the house. The first one would be animal print, of course..


I started with a beautiful green/petrol color by Erre Due, made my pattern with a metallic beige, almost gold color, from the same brand. Both were very opaque, and dried fast. I filed one side of a toothpick to make it almost round, and used it as a 2-way dotting tool:) I carved the line with the toothpick and made the leopard outlines.


We went with the kids to the playground, where I also found some flat pebbles, so I decided to make a matching ring, too!


I have to say this was the most fun part of it all..  The tutorial is already uploaded on my channel, if you like to see it, click here.

Here are the items I used:
Erre Due N. 468 "Accidental" - Erre Due/Mirror effect N.999 - Black polish (it didn't have code or name), and, of course, the toothick.