Saturday, December 28, 2013

More "Jewels"

These metal decorations are amazing! They realy transform your plain polished nails into precious jewels..


They are very easy to use, just adhere them with nail glue (or acrylic, if you want to keep them longer). Nail glue kept them on my nails 3 days, until I removed them myself to do something else:)


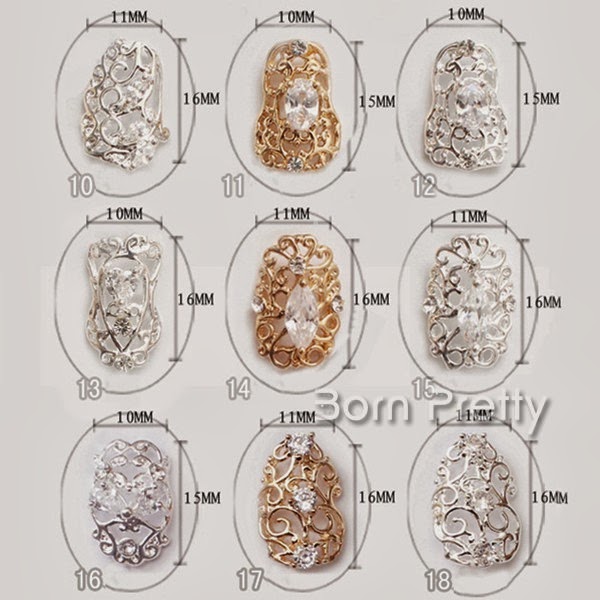
There are many more sizes and shapes, with different decorations. Go check their store to see which one you like and fit your nails:) http://www.bornprettystore.com/2pcs-luxury-style-nail-crystal-embossed-metal-nail-decorations-p-10749.html

Feel free to use the 10% discount code LNSW10 at checkout

I have also uploaded a video review on youtube, check it out if you are interested:


On my nails, there are 2 coats of a shimmery blue raf polish, Glamorous Nr. 67, and the metal decoration n.5


I also checked how they look on top of some other colors:

Color Club "Apollo Star"  and Korres "Washed Off Pink"

Erre Due "Matt Glam N.280" and OPI "Austin-Tatious Turquoise"

Bornprettystore Sweet "S049" and ColorClub "N.220 Seduction"

Remember I also used N.6 metal decoration for a gold new year nailart, in a previous post.

It looks very beautiful, don't you think?


Thursday, December 26, 2013

Precious Jewels

You can never go wrong with glitter.. especially these days

And nailart can never be too much for these days either. She came to me on the very last day, had her gel extensions with NSI, and asked for gold.. my pleasure:)


So, we finished with the gel application, shaped, buffed and top coated, and made a french with polish (Glamorous N.103, it is a simple gold polish). Then applied Golden Rose "Jolly Jewels n.103" on top of it, and while it was still wet, sprinkled some LCN holografic gold glitter (n.1 multi gold). I applied top coat on half the nail surface, to seal the glitter and make the transition smoother.
Then it was time for decorations:)

I was given these metal embossed decorations from bornprettystore, to review them. When I first saw them I was like "Woah!". Would I have them on my nails? Of course!!!! Would others?
I showed them to her and she instantly loved them.


Go take a look at bornprettystore, here is the link to these beautiful metal decorations: http://www.bornprettystore.com/2pcs-luxury-style-nail-crystal-embossed-metal-nail-decorations-p-10749.html The ones I used for Mary are N.6.


They come in pairs, and you can see the actual dimensions before you purchase. They are slightly curved, but keep in mind that each person's nail has a different c curve. I applied them with nail glue, and the 4 corners were fit perfectly on her nails. Then secured with a thick topcoat around them, not because I didn't want any water in, lol, just a second measure for their safety:) If you want to secure them for much longer, you can use a tiny ammount of clear acrylic.

The surface is irregular, like any ring with diamonds and stones.. You should not expect them to be smooth, they are jewels after all. They will not catch your hair, and they will not scratch when you wash your hands (yes, I got asked this question too, lol). The color will remain intact with washing and bathing. I had them on for 3 days myself, for the purpose of a review.


Bornprettystore offers 10% discount for any purchase you make from their online store, using the coupon code LNSW10 during checkout. Also, they offer free shipping worldwide.

I wish you all have happy holidays, blessings to you and your families <3 


IBD Just Gel polish "Cosmic Red"

This is the photo of the same nailart recreated with acrylic paint over the sweetest red, IBD Just Gel Polish "Cosmic Red" <3


This friend is not allowed to have long nails or polished nails at work, and I was very happy she trusted me for the holidays..!
We made gel extensions with NSI Balance (cover pink worm, it is my favorite) and applied IBD "Cosmic Red" on top, 3 very thin coats, even though 2 were enough. Applied topcoat, buffed and painted the bows that she saw on my nails with acrylic paint. Mine were made with polish, but I do not own a gel polish in pure gold. Topcoated again and voila!

Monday, December 23, 2013

Last minute nailart - easy bows - No tools

Here is a super easy nailart for new years eve, or party... or any other occasion if you change the colors:)


It seems I am stuck with red and gold these days.. I will not say glitter, because I love glitter all year long:)


Well, this nailart is done with a toothpick, no tools needed. I polished my nails, used the toothpick to paint a gold bow, and used the same toothpick to engrave the lines inside, the details. Here is the video of this super easy, last minute nailart:


The products I used:
CND "Veronica"
CND "Gold sparkling"
GLAMOROUS (gold)
SEVENTEEN N.529 Platinum Gold (glittery)
and of course, the toothpick!

I have already been asked to recreat this look, over red polishes. Maybe I will add the photo of it on top of IBD "Cosmic Red", but I can't edit any picture right now, too tired..


Christmas nailart with stickers

Normally, I use stickers for my pedicures (being lazy..) but this time I really had fun!


Bornprettystore sent them to me for a review. There were 12 sets in 1 sheet, and you can tell how vivid the colors are, and how fine the gold details, even from my pictures. There are many designs, snowmen, santa, christmas trees, snowflakes, sleights, even some borders that you can use for your nailart:


I made a classic white french, sideswiped with red, and applied my stickers. How easier can it get, really?


These are the products I used:
Korres "Washed off pink"
Seventeen (white n.103)
Erre Due "Glitter effect N.986" over the white polish
ColorClub N.220 "Seduction"

If you are interested in watching the review/nailart video, here it is:


Bornprettystore offers a 10% discount, if you use the following code during checkout:

LNSW10

Valid for anything you purchase from their website, free shipping worldwide.


Wednesday, December 18, 2013

Easy christmas nailart with foil

Last week I gave foils another try. I enjoy their looks, but I get so frustrated when they crack right after top coat.. and I have tried so many!


 I applied a dark red polish on all nails, except the ringfingers, where I applied a gold one. Then I applied foil adhesive, waited until it became transparent, and added the foil.

This time I tried 2 methods: On one hand I applied NFU Oh Aqua base on top of the foil (dries a bit slow) and then I used CND Super Shine top coat, which is not a fast dry one. Fast dry top coats always crack the foil.. The cracks were barely visible, but the foil lost some of the holo effect.

On the other hand, I applied the foil adhesive on top of the foil, let it dry very well (about 20min) and then I applied the Super shine top coat. This had the best results I have seen with polish so far, barely seen cracks and barely lost holo effect.

You can definately say which one is which..


    Then I decided it was too plain, so I added some gold stamping and glitter:)


I know, the thumb is different, but I always try on my thumbs first. I didn't like this Cheeky stamp, so I did the rest with another one, from the same Jumbo plate:)

Would you try foils for your nailart these days?


Christmas nailart

I am lucky to have a friend like Mary.. She lets me do things on her nails:)

This time we made a classic french overlay with NSI gel, and couldn't decide what to do, so we added a bit of all..  "Do you like the teddy bear?" "Yes, let's do it" "Oh, and can we make a christmas tree?" "Oh, and a santa?" "Oh, snowman would be nice, too!"

Don't get me wrong, I like the classic french, it is always elegant and wearable, no matter where you work, but I wish I was asked to do different things more often.


We made the Santa and teddy bear on the thumbs. 


Cute, don't you think?


Tuesday, December 17, 2013

Christmas Glam

Finally, my collaboration nailart with Beyonceesha is uploaded on youtube, and I am very excited!

We both used similar methods, hers being a more christmas design, lol, but my daughter said that my balls look like ornaments, too:)


I made a french manicure with CND "Serene Green" and topped it with "Emerald shimmer". Only the ringfinger is polished entirely. I then applied white polish, forming circles, added a drop of light green inside them and marbled. Then I made the outlines with black gel and cured in a uv lamp.


Then I applied the gold foil. On the lower hand, it was applied directly on the black gel's inhibition layer, on the upper hand I cleansed and applied foil adhesive and when it dried I applied the foil. As you can see, it was better with the foil adhesive. Although I could fix it with gold polish or paint, I left it like this, because it kind of looked like an antique gold..


I then applied IBD clear gel on top of the foil and marble circles, forming balls, for a more 3d look. I also applied a bit of gel on the golden smilelines and cured in a uv lamp. The gel worked as a magnifying glass, and the result was very beautiful.


I then cleansed once again and applied my normal top coat. Here are the products I used for this nailart:


So, the tutorial is already uploaded on youtube, and I am very happy. Beyonceesha did her best to keep the date, even though she had a problem with her computer and couldn't upload for a week. 


She made a beautiful nailart, don't you think?

If you want to check the video, here it is, I have her links at the end:


Saturday, December 7, 2013

Cute snowman french

Time is aproaching, it will be Christmas soon, but it is already snowing in many places around the world. This  cute snowman with beanie hat is handpainted (sadly, on one of these days when I feel I have two left hands..) but still looks cute, I think :)

I made a french manicure with an ink blue polish (Cnd Inkwell). I know it looks black, and the fact is that it also looks like black in real, just not the raven black. I faded the smileline with the sponge to let the color show more. I added Cnd gold sparkle effect, which is almost the same as Northern lights in gold and my topcoat, and then started painting..


I uploaded the tutorial on my channel, to watch it click here.


Here are the products I used:

Remember, I don't like Lidan very much, but I don't like to waste products (or money) either, so I will use them in nailart until I run out. Never for one stroke, though..